Do you need to fade your video to black, white, or any other color on your Windows desktop? We got you! Fade-in and fade-out effects are every video editor’s trump card. They make for seamless scene transitions, help certain elements pop on the screen, and are generally quite enjoyable to the viewer’s eye.
In the realm of video editing, the fade-in/out effect is much like a magician’s trick. It captures and guides the viewer’s attention smoothly from one scene to another. Picture a stage curtain gradually lifting to reveal a scene – that’s your fade-in. Now imagine it slowly dropping to end an act – there’s your fade-out. Utilized rightly, these effects impart a professional flair to your videos, ensuring a smooth viewing experience. It’s all about the art of perfect timing and application, akin to a magician pulling a rabbit out of a hat.
That said, they are not the most straightforward trick in the book. Going too far or fading too soon can devastate the entire impression of the video you’ve worked so hard on.
So, how does one pull these effects off? More importantly, how do you pull them off right?
Let’s address the basics to ensure we’re in the same lane.
Contents
What is a Fade-In/Out Effect in Video Editing?
The fade-in and fade-out effect is an essential tool in any video producer’s arsenal, adding a cinematic and professional touch to your videos. But what exactly does a fade do?
A fade-in is a transitional effect that gradually increases the visibility of an image or video from complete transparency to total clarity. In other words, the video moves from ‘invisible’ to ‘visible.’ It’s like the rising sun, slowly illuminating everything in its path. Filmmakers often use fade-ins at the start of a scene or a video, signaling the beginning of a storyline or chapter.
On the opposite side of the spectrum, a fade-out slowly decreases an image’s or video’s visibility — it transcends from a full, vibrant image to nothingness. Think of it as a gentle nightfall after a day of dynamic activity. A fade-out traditionally marks the end of a sequence or the whole video, providing a sense of conclusion or a transition to a new scene.
In both scenarios, the fade-in or fade-out effect is a smooth bridge between different parts of your video, guiding your viewer’s attention and preventing jarring jumps between scenes or concepts. It’s a small detail that can significantly impact your videos’ overall flow and professionalism.
Ready to get to work and add some smooth transitions to your videos? Please grab a cup of coffee, sit back, and let’s dive into the world of video editing on Windows!
How To Fade a Video on Windows: Four Steps to Magic!
For starters, you’ll need good software to edit your videos. If you use Windows 10/11, we suggest you give Animotica a shot. Animotica is smooth, easy, and fun to use. It’s also the most popular video editing app on Microsoft Store. You can install it for free to see how it works, and if you’d like to go all the way, you can get Animotica’s full features set at a decent price!
Click on the button to download or launch it if you already have Animotica installed.
Here’s how you apply fade-in and fade-out effects to your videos. In this section, you’ll learn how to fade in or fade out using a black or white background and how to fade in or fade out using a colored background.
You can run a quick, basic fade using these four easy steps:
- Create a new video project in the video editor
- Upload your video or images
- Select your desired clip
- Select the fade panel and adjust accordingly
- Save
Clear as mud, right? Let’s break it down!
Step 1. Create a new video project
Launch the app and create a new project. You can double-click the Animotica icon or launch it from the Start menu. Once the app starts, hit on New Project.


Step 2: Upload Your Video or Images
Just tap on Add Video/Photo Clips. From the pop-up that emerges, select Add Video or Photo Clips.


This will take you to your PC’s storage area. Navigate to where your video or images are stored, select them, and hit Open. You can select multiple files by holding down the Ctrl button.
Done? Now, it’s time to apply the fades.
Step 3: Apply your Fades
To apply the Fade in/ fade out on a single clip:
- Tap on the clip you want to apply the fades on. This will reveal a bunch of editing options.
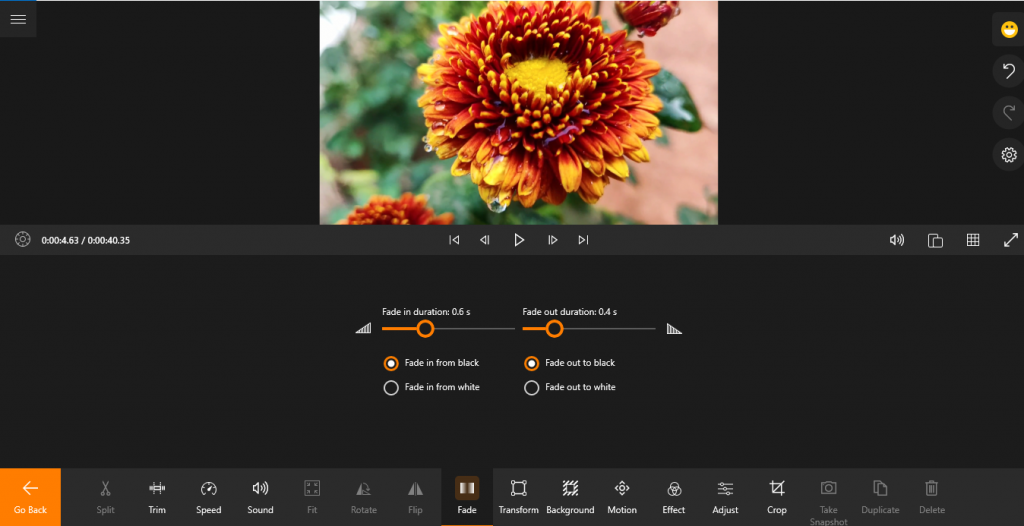
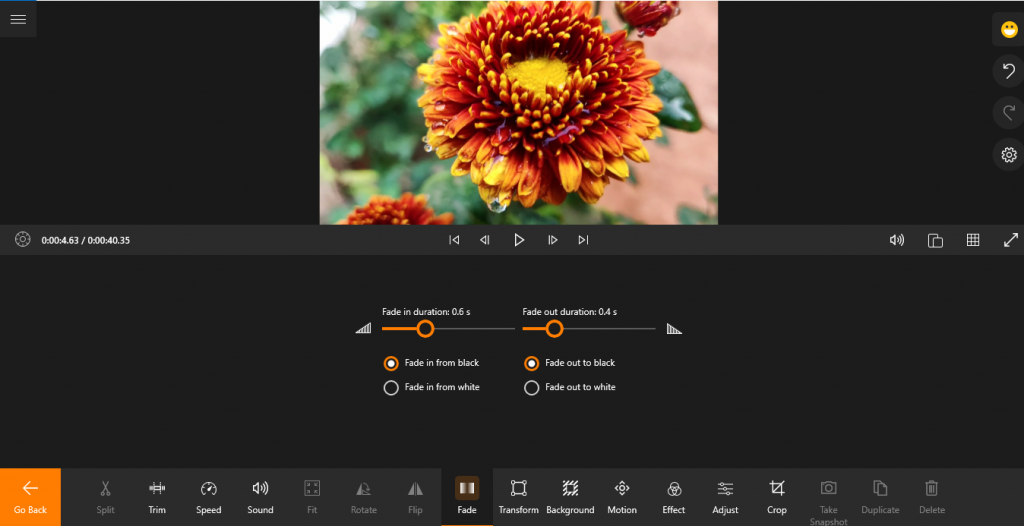
- Select Fade.


- Adjust the Fade In/Fade Out Duration slider on the new window to set when the clip should fade in or out. You can also choose between Fade In/Fade Out from white or black backgrounds.


To apply fade in/fade out between two clips;
- Select the transition icon between the two clips.


- Select Fade Black or Fade White and adjust the Duration of the Transition slider.


There’s more! You can fade in or out using a color you choose—you don’t have to do it with black and white. Here’s how it’s done:
- Tap on the clip you want to apply the Fade to.
- Click on the ‘+’ icon just before or after the clip, depending on where you want to use your Fade.


- Select Add Color Clip from the pop-up, and tap on the pencil icon on the new window to reveal a set of colors you can use.
- Once you’ve selected the color, add the Opacity transition and set the duration slider.


That’s all! You’ve just applied the fade-in/fade-out feature!
Pro Tip. Set the Duration of each Transition to 2 seconds.
Use the play key to preview and adjust the Duration of the clips if you’d like something more personalized.
Step 4: Save
If you finish editing your masterpiece, click the ‘Save’ button and choose the settings, and your video will be downloaded after the rendering.


How to Apply the Fade In/Out Effects Correctly
Let’s delve into the art of balance regarding video fading effects. The transition won’t achieve the desired compelling impact if it is too quick or unbearably slow. Here are a few handy pointers to guide you on this journey of video editing exploration.
- Configure the Duration of your video clip to precisely 3 seconds.
- Establish the period for the opacity transition to exactly 2 seconds.
Following these guidelines, you will produce a polished fade-in or fade-out effect ideal for switching up scenes in your video or creating an effortless loop. Mastering this technique will go a long way in improving the overall aesthetics of your work.
Do you have any lingering questions? We’ve cooked up this instructional video guide just for you!
How to Fade In & Fade Out a Video on PC [Video Tutorial]
If you’re more of a visual learner, don’t worry, we’ve got you covered. We’ve prepared a detailed video tutorial that explains each step of the process on how to apply fade-in and fade-out effects to your videos on a Windows PC. The tutorial will guide you from the beginning to the end – from creating a new video project to uploading your content, applying the fades, and wrapping things up. This tutorial is perfect for beginners who are eager to learn about video editing techniques. Check it out for a step-by-step, hands-on guide.
How to Remove a Fade-In/Out Effect or Transition
So, let’s say you’re in a scarce situation where you don’t like what you see; you can remove a fade effect and transition by following these easy steps.
Step #1. Select the Fade Panel and drag the duration sliders back to zero.


Step #2. Hit the color clips on each side and select the trash icon. The transition effects will automatically go with the clips.


Step #2. If you want to remove the transitions, click the transition box between the two clips.


Step #3. On the new transition menu, select None. Voila!


Conclusion
Congratulations on making it to the end of our guide on how to fade a video on Windows 10/11. By now, you should be able to create a new video project, upload your videos or images, cleverly apply fade-in or fade-out transitions, and even know how to remove them if needed. Fades are a vital tool for video editing, giving your work a professional feel by smoothly blending scenes and improving the flow of your footage.
Remember, video editing doesn’t belong solely in the domain of professionals. Everyone can enhance their videos with this excellent fade effect. It’s all about jumping into the practice and polishing the execution.
The video editing world is at your fingertips, and you can now take full advantage. Create magic with your videos using what you’ve learned about video fades. Keep experimenting, and you’ll continue to master new skills.
Before you run along, download Animotica, a user-friendly and intuitive video editing software that will help you easily apply everything you learned today and more!
Happy editing! ✨


