
Indeed, you’re not the only one who wants to know how to create a Udemy course!
Selling courses has proven to be one of the most popular ways of making passive income online, and among the slew of online course platforms available today, Udemy stands as the largest e-learning marketplace, with over 50 million students and 57,000 tutors.
It is estimated that the global e-learning market will reach almost $1 trillion by 2028. Since 2020, universities have shifted 98% of their classes to online platforms. E-Learning has been found to improve learners’ retention rate to 82%, and corporate e-learning takes 40% to 60% less time to complete compared to traditional learning.
This spells a whole lot of opportunities, revenue-wise, and explains why the platform continues to record new interests from wannabe online tutors all over the world.
Most course creators join Udemy—or any platform for that matter—because of the juicy idea of getting financial freedom while making positive impacts.
So, if you want to know how to create a Udemy course, you’re at the right place.
This guide contains the necessary steps, along with pro tips from high-earning Udemy course creators.
Along with steps and valuable tips, we will also include the necessary tools and resources you’ll need, so you will start creating courses, giving useful information, and rolling in the dough in no time!
Sounds good? Let’s hop into it!
Contents
Step-by-step Guide on How to Create a Udemy Course
Step 1: Choosing What your Udemy Course will be About
This may seem like an obvious one to the average person, but according to Jack Pitman, a Udemy Course Creator, a lot of aspiring course creators want to create a course, but they haven’t figured out what they want to make a course on.
Indeed, it goes beyond saying, “Okay, I’ll make a course on Python.”
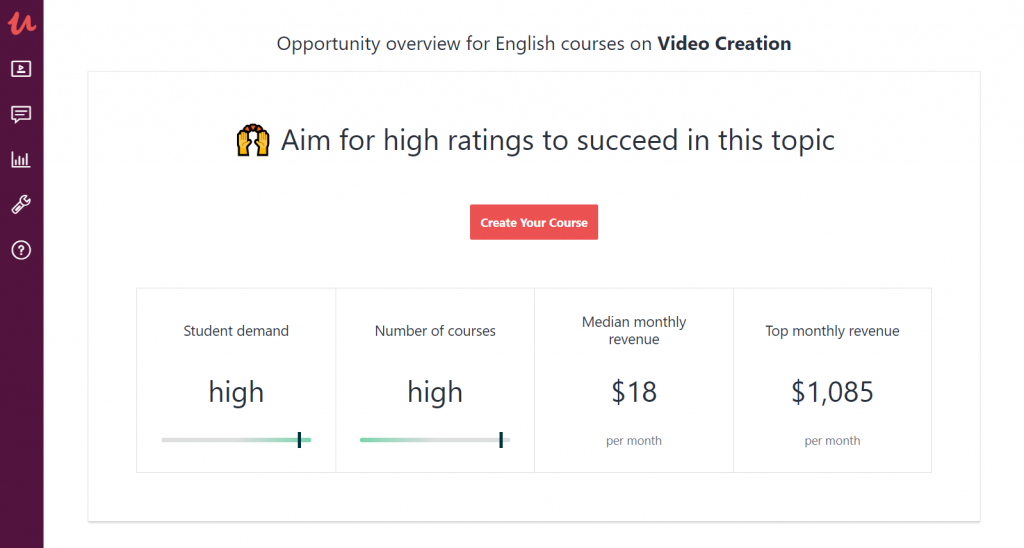
According to Louise Croft, you have to match your course idea with the level of demand while paying attention to who you will be competing against in the Udemy marketplace.
You can determine this by using Udemy’s Marketplace Insights tool.
Here are some points to take note of:
- You can proceed with a subject you’re already a pro in. But if it’s saturated or doesn’t have just enough demand, you can check out other well-performing courses using the Marketplace Insights tool. Pick one course that most interests you and get your research up and running. It is crucial to always find one thing you can do better about the course you’ve chosen. That is essentially what will set you apart.
- Once you’ve decided what to teach, identify your target audience, and map out goals you’d want them to achieve through your course. This will be crucial when you start creating your course landing page.
- Optimize your title using keyword research tools. Keyword research tools basically give you the most used search terms and phrases in your category. For example: If you’re teaching Python, you will see search phrases like Python for Beginners, Zero to Hero Python, Learn Python, Python 101, etc. Keyword research tools help you know all these terms so you can decide how to construct your titles for better visibility. Some free tools you can use include Ubersuggest, Google Trends, Keywordtool.io, etc.
Step 2: Setting Up the Groundwork
This stage has to do with planning and outlining your course. For starters, it is not advisable to make a very lengthy course. Four to six hours of content is usually advisable. You would also need to split your course into sections, including introduction and conclusion, for easy consumption. Each section should also have a series of sub-topics.

Your videos should be around 2 to 10 minutes each. However, for more practical videos, feel free to make them longer. Just try to keep things short and sweet. Also, ensure you briefly describe what each section is meant to accomplish and also make descriptions for each lecture. This will give your course a rich, detailed quality.

Scripting your content is advisable, but if you’re more experienced and prefer going off-the-cuff, you might want to just make bullet points for each topic so you don’t miss important details.

Decide how you want to visually present your content: Talking head? Slides? Screencast? You decide. Also, you can combine these formats to bring some variety to the table.

Cool stuff. You should prepare a bunch of resource materials, PDFs, quizzes, exercises, projects, etc., to keep your students engaged and give your course some hands-on feel. Think of what will be the giveaway part of your course – some artifacts your students will keep after the course is over.
At this point, you should not really stress yourself too much about making a full-fledged course sales page yet. Feel free to just jot down some points you might forget to add on the sales page, but it doesn’t have to be completed. Focus more on making the course. Afterward, when you’ve determined how much value you put in your course, you can use the information to build your sales page. We will talk more about sales pages later.
Here’s a template to help you create your Udemy course outline, courtesy of Udemy!
Step 3: Filming your Course
This is where the dirty work begins. By the time you begin to create your Udemy course, you’ll realize why filming your lecture is supposed to take you a lot of time. Do not rush it! Udemy usually rejects courses when the video and audio qualities are not up to standard.
First, you need to determine if you will be filming yourself, your screen, or both! This does depend on what course you’re teaching. More practical courses will, however, require more of you to show what’s going on on your screen.

Pay attention to your audio quality. Invest in a good microphone. Film in a quiet place, but don’t film in an empty room with echoes. In fact, David Power, a Udemy course creator, films in his car!

Your lighting should also not be taken for granted. You can film in bright daylight, or you can invest in good lighting equipment. Just make sure there are a few shadows as possible, and your face is clear enough.

For filming, if you have an iPhone, you can shoot great videos with its camera. But, if you can invest in a proper camera, that’d be great. Generally, Udemy prefers a video quality of at least 720p HD. Also, ensure you have a tripod or any makeshift equipment that will aid stability.

For recording your screen, you can use screencasting software, such as Camtasia, OBS studio, etc.

When filming, try your best to keep it 10/10, but if you get distracted, sneeze, swear, or have your kitten run into the scene, do not cut the recording. Just keep going. The aim is to hit the finish line. By the time you’re done with editing, all the unwanted parts will be gone!
You do not need to have a world-class studio and filming equipment to start off. Here are some jaw-dropping hacks from Udemy course creators. You’ll be shocked by what they did.
There’s also a free checklist of items you may need to film your Udemy courses.
If you’re not sure about the quality of your video, you can always send a test video to Udemy, and a team will give you feedback in a couple of days.
Step 4: Polishing your Course
This is what professionals refer to as post-production. At this stage, you get to edit your videos, cutting off the parts where you sneezed, swore, or mispronounced words. You also get to break the large footage into sections and short lectures, add texts to highlight key points, play around with color effects, blur out sensitive information, add transitions, perform noise reduction, and many more.
You basically take your footage from its raw form to a more refined form!
There are several video editing software capable of doing this. Indeed, several Udemy course creators made use of Windows Movie Maker, but since it was removed by Microsoft, other alternatives have emerged.
If you use a Windows 10/11 PC, we strongly recommend Animotica, our easy-to-use, magical video editor. With Animotica, you can edit your videos like a pro without having all the deep, sophisticated knowledge of video editing!
Try it for free here.

If you use a Linux system, Lightworks might just work for you. If you use a Mac, iMovie is a popular software for people in your category.
You might also find some useful stuff in the 107 Tools for Vlogging blog.
Step 5: Uploading your videos to Udemy
You can upload your video as soon as you edit each section, or you can just use Udemy’s powerful bulk uploader to get everything up at a go. Udemy’s bulk uploader is relatively easy to use. You just have to take a little time to understand the environment.
To upload your videos:
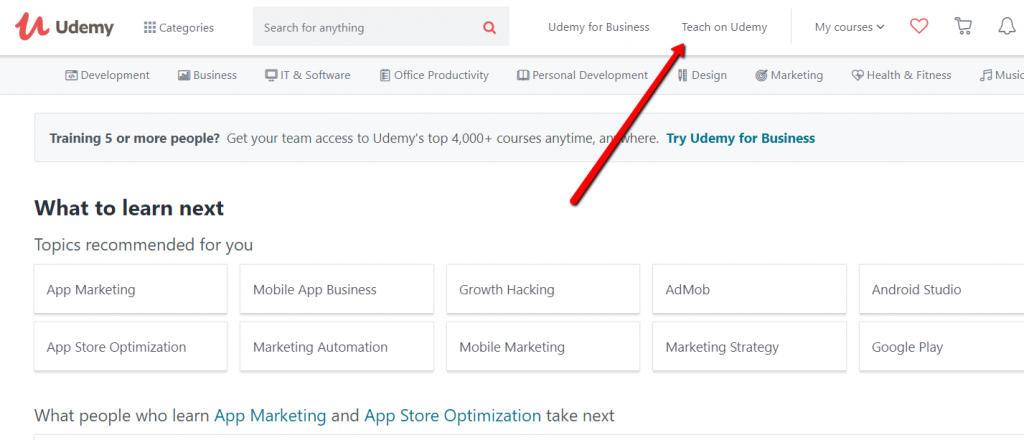
- Visit Udemy and sign up for a free account.
- Once you’ve signed up and logged in to your profile, click on Teach on Udemy.
- On the next page, select Become an Instructor. Answer the questions that follow, clicking Continue each time.
- On the next page, hit Create Your Course and fill out the subsequent forms accordingly, answering basic questions about your course.
- Just after you’ve added your title—which can be changed later—you’ll be taken to a new page where you can upload your videos. Feel free to jump right to Create Your Content.

- Hit Curriculum to upload section by section, or hit Udemy’s Bulk Uploader to upload your videos at once. You can also upload resource materials for each section here.

Feel free to try this step now to see how the environment looks even without having your course ready. It will allow you to get familiarized with the system beforehand.
Step 6: Creating your Course Landing Page
Your landing page is a vital part of your success on Udemy. This is because this is where your potential students get to decide whether your course is worth their time and money or not.
Making your landing page was designed to be easy. It basically comprises:
- Your Course Title: The title you’ve chosen for your course. Make it concise, specific, and realistic. For example, Complete Python Training: Go from Newbie to Pro in Python. Here’s a guide from Udemy.
- Your Subtitle: A brief overview of what your course is all about. You may add a maximum of two related keywords, but don’t force it. Example: Learn Python like a Professional! Start from the basics and go all the way to creating your own applications and games!
- Course Description: Here’s where you get more detailed about your course. Tell your potential students what your course is about, what level of skill they need to be a part of the course. Any bonuses? What sort of projects did you include? How long is the course? How many lectures are contained inside?
You can also list some of the most exciting topics covered within your lectures using bullet points. Also, be sure to list out the benefits each student will get from taking your course. Feel free to get inspiration from your competitors’ course landing page, but don’t plagiarize! Be sure to highlight key points you want your potential students to notice.
- Course Image: This is simply your course’s thumbnail. It’s the image that will draw prospective students to clicking on your course. That said, it has to be really attractive and ‘clicky.’ The good thing is, if you don’t know how to design a thumbnail, you can simply let Udemy do that for you by sending a request. If you are making your own course image, make sure you’re not violating copyrights. Here’s a helpful guide from Udemy.
- Preview Video: This is where you give your potential students an insight into what to expect from your course. You can make a separate video for this purpose, use your course intro video, or just turn on a free preview for any lecture you feel is interesting. Remember to keep your previews short and sweet—2 to 4 minutes.
- Instructor Profile: Here’s your chance to sell yourself. Tell your students about yourself and how experienced you are. You can go a little motivational by capturing memories of you struggling with the skill your teaching and finally finding what works! Include some fun facts about yourself, just to show you’re not boring.
You may also link to your social media handles.
Step 7: Submit for Review
Alright, you’ve made it to the final step. But before you hit that ‘Submit for Review’ button, We’ve got a few handy tips to ensure your course sails smoothly through the review process.
First, ask yourself – did you adhere to the video lecture requirements? Udemy is pretty meticulous about video quality, so double-check if your content is shot in HD video with clear audio and good lighting. It may sound trivial, but a poor-quality video could lead to rejection.
Secondly, did you offer a positive learning experience? Your course needs to be more than just an information dump. Make sure it’s interactive, engaging, and valuable to your students. Don’t forget to include quizzes, assignments, and other interactive elements to keep your learners hooked.
Lastly, remember to review your course personally. Watch your own course as if you’re a student, and be honest with yourself. Do the lectures make sense? Are there any technical issues, like off-sync audio or pixelated footage? Does it meet Udemy’s lecture length requirements?
If you can confidently respond ‘yes’ to all these pointers, you’re ready to click on ‘Submit for Review’.
Step 8: Promotion!
Attracting students to your course is just as crucial as creating quality content for them. Knowing how to properly promote and market your Udemy course is essentially a game-changer for your success in 2024. So, what’s the game plan?
Content Marketing
The clue’s in the name: if you’re teaching a course, you’re likely an expert in your field. Why not put that expertise to use outside of the Udemy platform and establish yourself as a thought leader? Now this, dear reader, is where content marketing plays a vital role. Creating useful content around your course topic not only helps showcase your competence but also brings stardom to your course.
- Launch a blog and write in-depth articles related to your course’s subject. Not only will this grant you better search engine visibility, but it also demonstrates your deep understanding of the subject.
- Host webinars or live-streams on platforms like YouTube, Facebook, or Instagram. Engage with your audience, answer their queries, and present teasers from your course. It’s a surefire way to build anticipation!
Social Media Marketing
Worldwide, there are over 3.6 billion social media users. That’s a vast potential student base at your fingertips. Harness the power of social media to create awareness about your course:
- Share snippets, interesting facts, and short lessons from your course to attract potential students.
- Reach out to influencers in your field, as they might be interested in promoting your course to their followers.
- Join pertinent groups and participate in discussions. Promote your course naturally without being overly salesy. Remember, no one enjoys a hard sell.
Udemy’s Marketing Tools
Udemy provides its instructors with some nifty marketing tools. Here’s how you can use them:
- Educational Announcements: These are tactical emails that you can send to your students twice a month. Share useful resources, and course updates, or introduce your new courses.
- Promotional Announcements: You can send out promotional emails to your students four times a month, promoting your courses or offering discounts.
- Course Coupons: Generate and share coupons for your courses. These coupons can be a deep discount or a nominal offer; either way, they are a great tool to draw students to your course.
Remember, marketing your course isn’t a one-time task – it’s an ongoing process. Maintaining a robust online presence and keeping up with promoting your courses will play an influential role in your success as an Udemy instructor in 2024. So, are you ready to get noticed?
Pro Tips for Udemy Creators!
If you’re a newbie to the world of course creation, there are mistakes you’re likely to make, this section helps you avoid some of them. Also, you’ll get insight into a few things you can do to have a better experience.
That said, here are some tips from the pros:
- Udemy actually recognizes several file formats—.mp4, .flv, .wmv, .mov, etc.—but if you want to have a hassle-free experience on Udemy, use .mp4 videos.
- If you’re combining videos and slides, your slides should be in .pdf format.
- Do NOT give out your courses for free. You can do so for a select few in the opening stages of your courses, as long as you follow them up to make sure they actually complete the course and leave you reviews. Other than that, giving your courses for free will definitely result in massive sign-ups, but your engagement will be low because a lot of people just like to pile up free courses. Worse, some of them may leave bad reviews after casually going through a couple of lectures and not understanding anything. This will ultimately sink your Analytics, turning your course into a failure. You’re better off selling it at a low price.
- Do not abandon your course once it gets launched. Keep updating it to maintain relevance. That said, keep your eyes on the big competitors.
- If you want to make as much money as possible, do not leave all the marketing to Udemy. Promote your course so you can get a better revenue share. For example, if you get students to sign up on your course, you will get up to 97% of the revenue. However, if a student signs up on your course from Udemy marketplace organically, you get 50% of the revenue. Here’s more about Udemy’s revenue-sharing model.
FAQs
How Much Does it Cost to Create a Udemy Course?
Rather surprisingly, creating a Udemy course doesn’t hit your wallet with any upfront fees. Udemy, in fact, charges a ZERO fee for hosting courses crafted by creators like you. However, it’s important to consider that different costs may arise as per the level of quality and intricacy you plan for in your course. Such costs could find their roots in various places:
- Equipment: Your needs can vary from basic essentials to advanced tools. An investment in a superior-quality microphone, laptop, and camera can be in the range of hundreds of dollars. And to help you out, here’s a complimentary checklist of must-have equipment items. –
- Software: Perhaps, you’d like to deploy more professional editing software to bestow your course with a polished aura. The fee for these subscriptions can stretch from a handful of dollars monthly to an elevated scale for more cutting-edge software.
- Other assets: Don’t leave out costs regarding props, location fees, or the hiring of specialists for sound mix improvement or course validation. But hey, let the tight budget not dampen your spirits! To help you out, here’s a shortcut you can utilize to trim expenses without compromising on the quality bar.
What are The Requirements for Creating a Udemy Course in 2024?
Creating a Udemy course in 2024 requires a few essential aspects that you must consider. While the platform boosts a great spot for teaching and learning, it also maintains numerous content and quality standards you must adhere to. Different from personal blogging or YouTube video creation, you are now building an educational product. So what exactly are the parameters? Don’t worry—you’ve got this!
- High-quality Video and Audio: Begin with a dedicated focus on the key elements of your course—the video and audio. No one wants to learn from a video that’s blurry or sounds like it was recorded in a windy canyon, right? Make sure your course content is in HD (720p or 1080p) and the sound is clear without any background noise. Investing in good quality equipment can make a big difference here.
- Impactful Course Content: Now, let’s talk about the core—your course content. At the end of the day, it’s the value that you provide to your students that matters. Ensure that your course is educational, valuable, and in-depth. You need to cover a comprehensive topic in a manner that’s engaging and insightful for the students.
- Engagement: Udemy requires every course to engage students, so include quizzes, exercises, assignments, and discussions in your course. Remember—active learning is always the best learning!
- Hours of Content: Udemy mandates a minimum of 30 minutes of video content for a course, but that doesn’t mean you stop there! Depending on the complexities and nuances of your topic, your course could stretch for several hours. But be careful not to ramble—every second should be value-packed!
Moving ahead, there are some technical specifications and ethical guidelines Udemy is quite stringent about. Being aware of the following is critical:
Excited yet? You are on your way to creating an enlightening course that could change lives. So get started and remember—consistency and quality beat speed any day!
- Course Structure: Your course must be a minimum of 5 lectures and, as mentioned above, has to have a minimum of 30 minutes of video content.
- Udemy’s Instructor Community Guidelines: Udemy has a set of guidelines designed to ensure that the interactions on the platform are respectful, reliable, and without any foul play. Make sure you familiarize yourself with these guidelines to ensure you meet the platform’s ethical standards.
- Udemy’s Trust & Safety Policies: Apart from the instructor guidelines, you also need to adhere to Udemy’s Trust & Safety Policies concerning things like privacy, copyrights, and overall conduct.
- Verification: Udemy requires every instructor to go through a verification process. This is to ensure authenticity and safety and to maintain a high level of trust within the Udemy community.
- Rules regarding “free courses”: If you’re setting up a free course, remember there are rules regarding changing it to a paid one later.
No crystal ball is required to foresee your success in creating a brilliant Udemy course! Now that you know the requirements, it’s time to dive in headfirst. So, what are you waiting for? Go ahead and create a course that students will love!
How Long does it take to Create a Udemy Course?
Creating a Udemy course time frame varies and highly depends on a few factors. These include the complexity and length of your content, the level of quality you aim for, and your familiarity with course creation processes. Your daily time commitment to the course creation can also affect the timeline. And don’t forget to account for time spent on making promotional materials and setting up your course landing page. Remember, rushing won’t do any good – the quality of your course is key to ensuring a great learning experience and your success as a Udemy instructor.
How Much Can You Make on Udemy?
Though the allure of earning big bucks is intoxicating, let’s set the record straight about potential earnings. Making your fortune on Udemy may not be as simple as pie. Some powerhouse instructors rake in a sizable $2,000 to a whopping $10,000 each month, while others might earn a more modest income. Your earnings are not mere happenstance but rather a blend of various elements, such as your marketing methods, your audience’s breadth, and the appeal and unique selling proposition of your course.
Success stories like those of Jack Pitman, who earned a cool $2,000 right off the bat in his first quarter, certainly set the bar high. Nevertheless, bear in mind that everyone’s Udemy journey is distinct, and results will inevitably vary. Rather than fixating on these figures, focus more on delivering high-quality, engaging material — the rest will follow!
Final Words
Creating courses on Udemy does take some time and energy, but if you follow the steps we’ve discussed, you’ll be able to get an excellent course up and running.
We hope that our guide on how to create udemy a course will be helpful to you as you begin your journey as a Udemy instructor.
Don’t forget to try Animotica, our superb, easy-to-use video editor anytime you get to step 3.

Cheers!
You might also like:
107 Vloggin Tools and Resources for Amazing Results in 2024
100+ Key Video Editing Terms Every Beginner Should Know
How To Make Your Kids Channel on YouTube?


1 Comment
This is a really great article. The writer tried…. Thanks