Are you fond of capturing those captivating, quick snippets with your handy smartphone? Just a warm welcome to the vibrant world of YouTube Shorts – a realm with an astonishing 3.5 billion daily views! With such staggering stats, doesn’t it feel necessary to know how to adeptly edit and refine our raw clips into sleek, compelling, and above all, worthy of sharing content, don’t you think? Let’s roll up our sleeves and dive right in! Together, we’ll journey through the exciting process of editing YouTube Shorts on a PC, ably assisted by our reliable partner, Animotica. Better fasten your seatbelts because this ride is about to crank up a notch!
Contents
Why are YouTube Shorts Popular?
So, you’re scratching your head, wondering, “Why are YouTube Shorts trending right off the charts suddenly?” Well, let us break it down for you. Short-form videos are having their moment in the sunlight. With our goldfish-like attention spans and fast-paced lives, we’ve trimmed down our content consumption to bite-sized, easily digestible pieces.
YouTube Shorts, just like its counterparts TikTok and Instagram Reels, offer this short-but-sweet content that users can gobble down in just a few minutes or even seconds. Believe it or not, according to YouTube’s very own stats, more than 3.5 billion views are clocked daily on Shorts. On top of that, they’ve garnered a whopping 6.5 billion daily views as of July 2021. Now, that’s quite a statistic, isn’t it?
Another reason for this quick rise to fame? Their accessibility. All you need is a dash of creativity, your smartphone, and voila! You’ve already got your ticket to potential virality. So, it’s no wonder YouTube Shorts have become the internet’s new darling.
The Pros and Cons of Editing Outside of YouTube
Before diving straight into the tutorial, it’s important to consider the advantages and disadvantages of editing outside of YouTube. This process can be both rewarding and challenging, so let’s explore the details.
| Pros ✅ | Cons ⛔ |
| Freedom of creativity is a standout benefit. External editing software gives you a broader horizon for innovation. Think of unique transitions, engaging effects, and dynamic text. Software like Animotica and Adobe Premiere Pro could become valuable tools. | The biggest drawback could be the costs involved. Top-tier editing software generally comes with a high price tag, which might not fit into everyone’s budget. |
| Quality assurance is another perk. Utilizing an external editor allows you to maintain optimum video quality, freeing you from the worries about compression reducing the quality of your content. | Time commitment is another issue. These editors can have complex menus and lots of options, making them somewhat intricate to navigate for newcomers. |
| Convenience is an added bonus as you can comfortably save work-in-progress projects to revisit at another time. You won’t have to worry about losing your work from unforeseen mishaps like a spilled cup of coffee. | The learning curve can seem daunting with such robust software. It might require a considerable amount of time to get the hang of all the features and functionalities. |
Despite these challenges, you shouldn’t be deterred from trying to create outstanding YouTube content. With a user-friendly editing program like Animotica, you can still rock the YouTube scene. We’ve got a detailed, easy-to-follow guide coming up that will help you navigate this process. No, we can’t literally hold your hand, but we’re quite sure our guidance will reassure even the most technically proficient readers!
How to Edit YouTube Shorts on PC with Little or Zero Editing Skills
Here we are, ready to refine your YouTube Shorts on PC. Our tool of choice? A savvy, easy-to-use video editor known as Animotica. It’s feature-rich, user-friendly, ideal for any video project, and, best of all, it’s free. Click below to download and kickstart your editing journey.

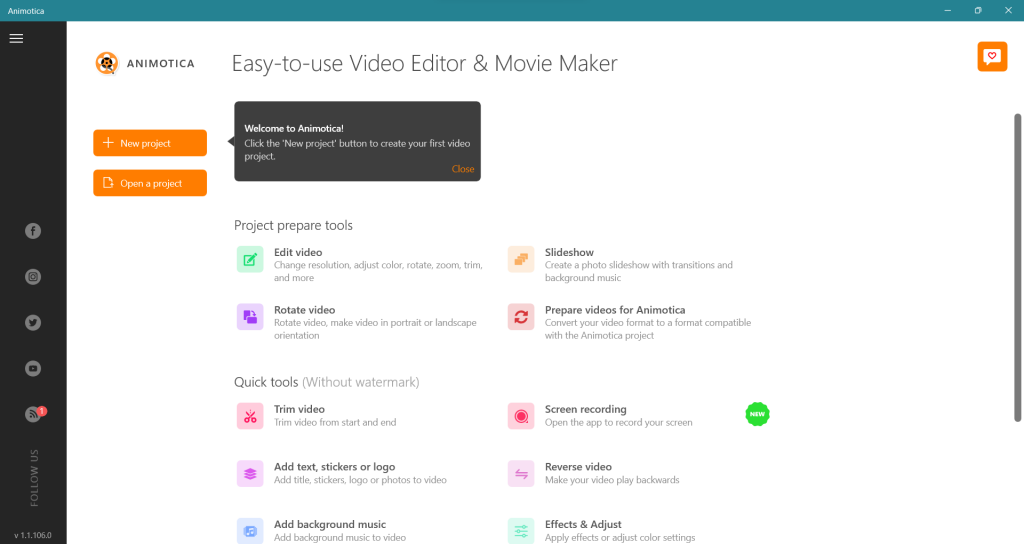
Once you’ve installed Animotica, fire it up and select ‘New Project’. Now that we’re all set, let’s dive into the substantive part – the editing process. Ready? Let’s embark on this video editing adventure.
Step 1: Upload Your Files
Firstly, open the Animotica app on your PC. After navigating the interface, click on the New Project button to start.
Then, import your video files into the app. You can do so by selecting them individually or by selecting all files in a folder using Ctrl + A on a Windows PC.
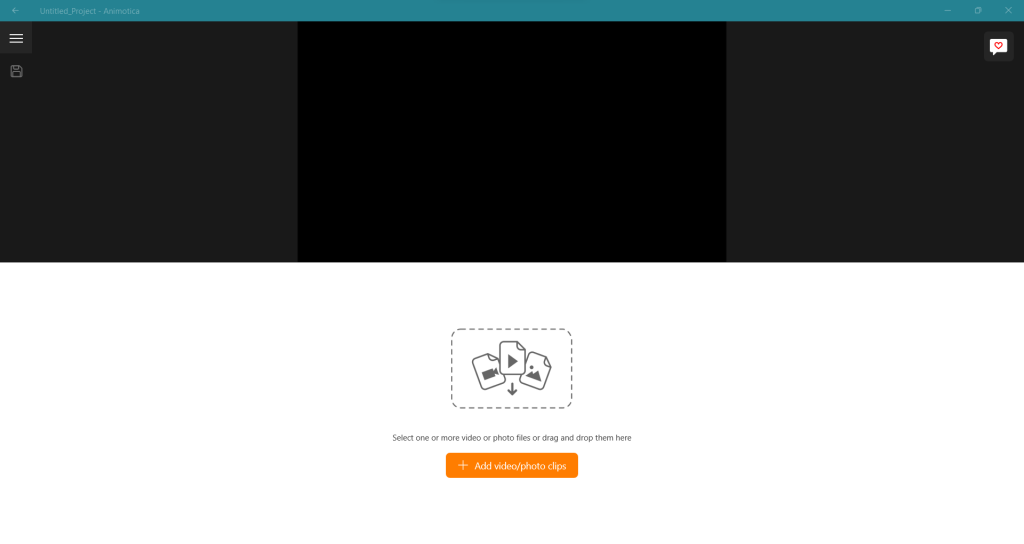
- Select your clips: Choose each video file individually, or select all files in a folder at once.
- Drag & Drop: Drag your chosen files towards the Animotica window, release the mouse button, and your files will be imported.
Once completed, your video files will be ready for editing.
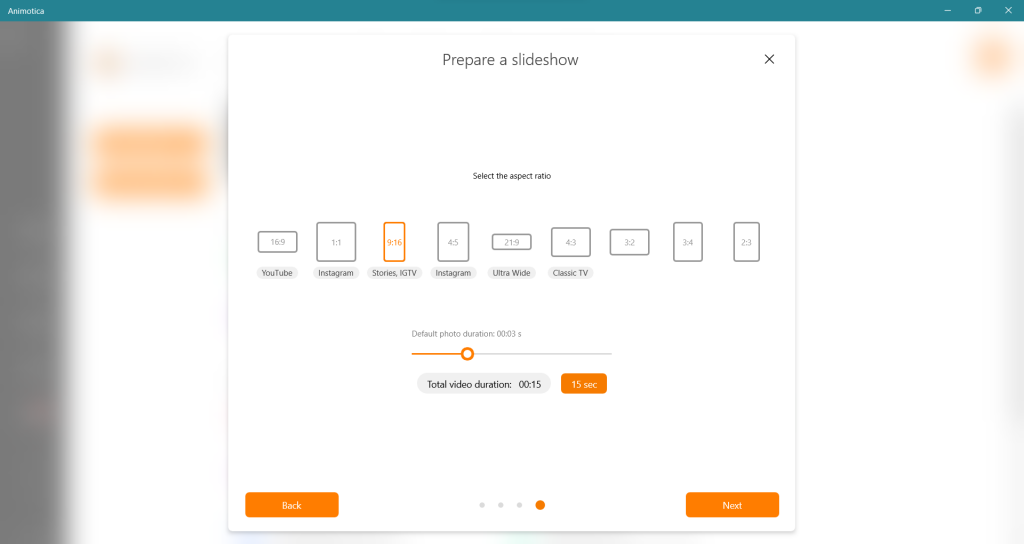
Step 2: Set the Aspect Ratio
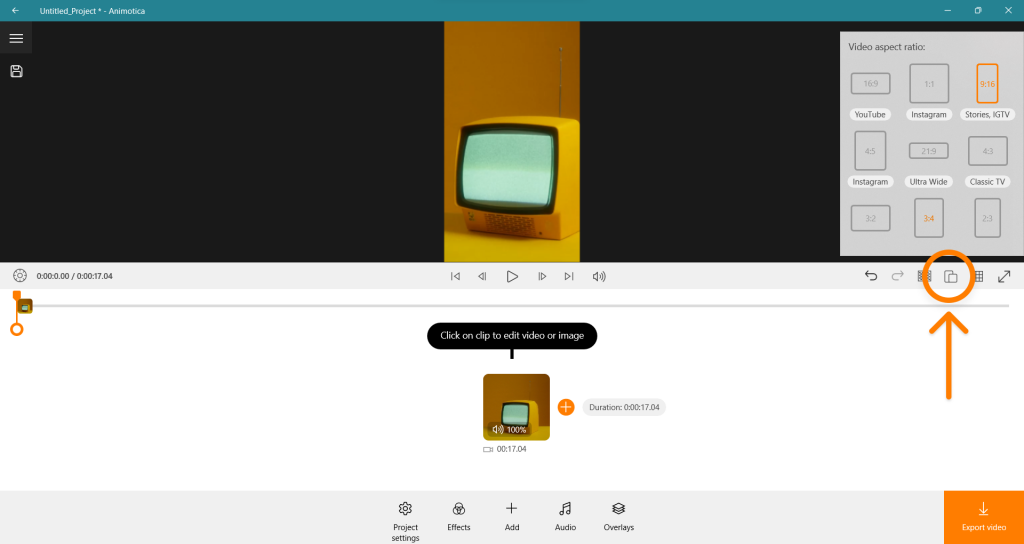
So, you’re ready to create a video for YouTube Shorts in the 9:16 aspect ratio, right? Don’t fret if you’ve already filmed in a different ratio. In Animotica, adjusting your aspect ratio is a breeze.
Simply click on the ‘Aspect Ratio’ icon, then choose the 9:16 (Portrait) format. Adjustments made easy!
- Click on the ‘Aspect Ratio’ icon.
- Select the 9:16 format (Portrait).
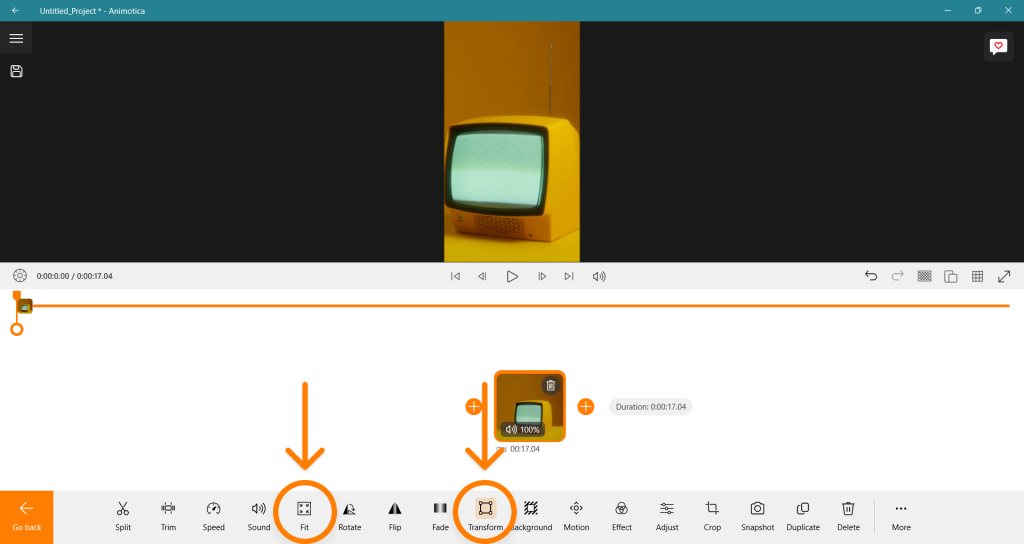
Your video might seem cropped, but no worries. Here’s how you can include the whole frame:
- Select ‘Fit’ to return everything back into view.
- Use ‘Transform’ to adjust the scale and restore your frame.
Great! Now, we’re set to add audio to our project. Let’s proceed, shall we?
Step 3: Add Sound Clip
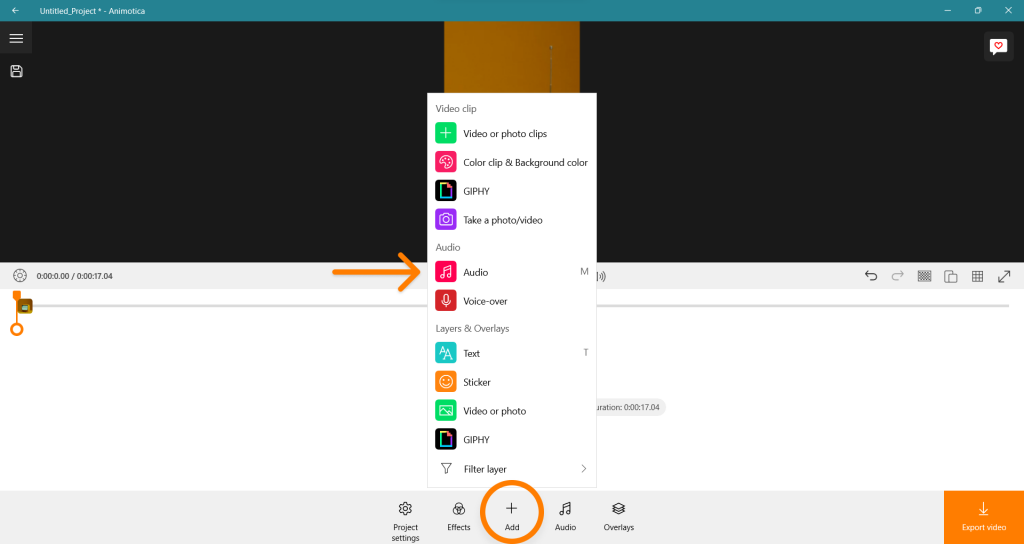
Adding a sound clip, are we? Let’s jump in. Click on the speaker icon that whispers ‘Add audio’.
- Latch onto your chosen sound clip and slam that ‘Add’ button. Think of it like snagging the last slice of pizza at the party.
- Pimp up the clip as desired. Adjust the volume levels and snip the sound clip. But keep it like a sweet symphony, not a racket—your viewers will appreciate your restraint.
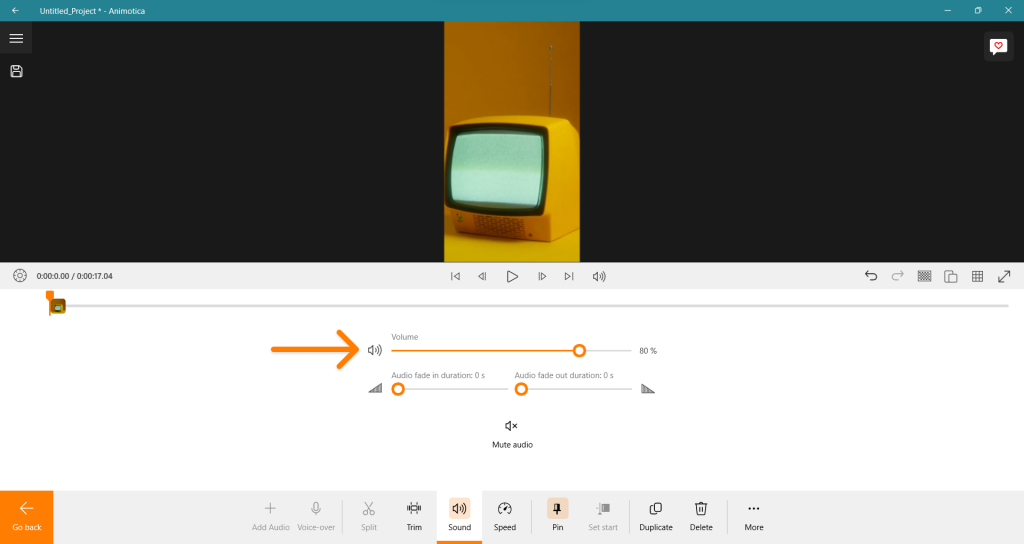
- Once everything sounds pitch-perfect, like an opera singer hitting the high notes, hit ‘Go Back’. Remember, you’re weaving not just a visual tapestry but a whole audio-visual extravaganza. So, keep calm, no pressure!
Voila! You’re now a sound master, ready to amplify your YouTube Shorts. Give those fingers a rest, rejuvenate, and once you’re all tooted up, let’s march on to our next lesson.
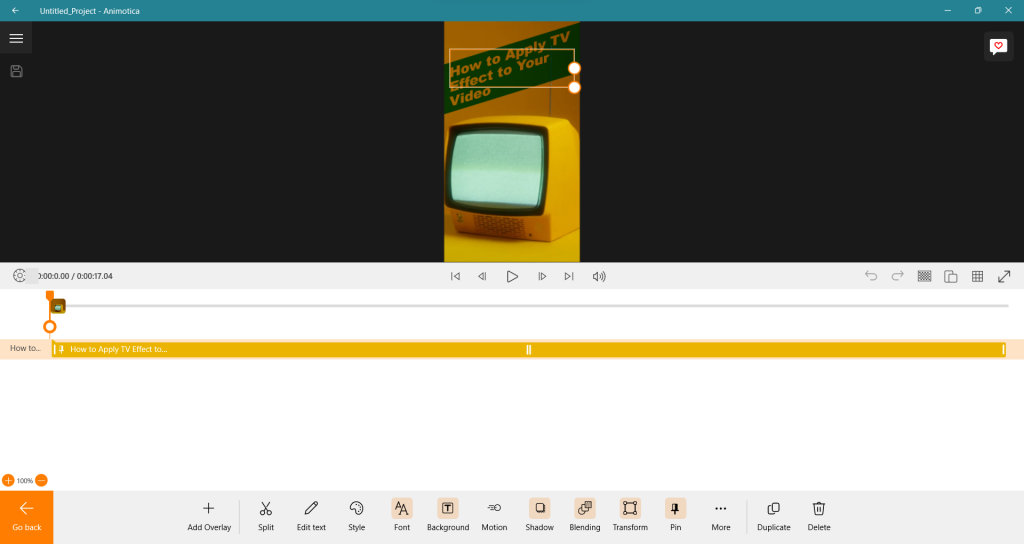
Step 4: Add Captions
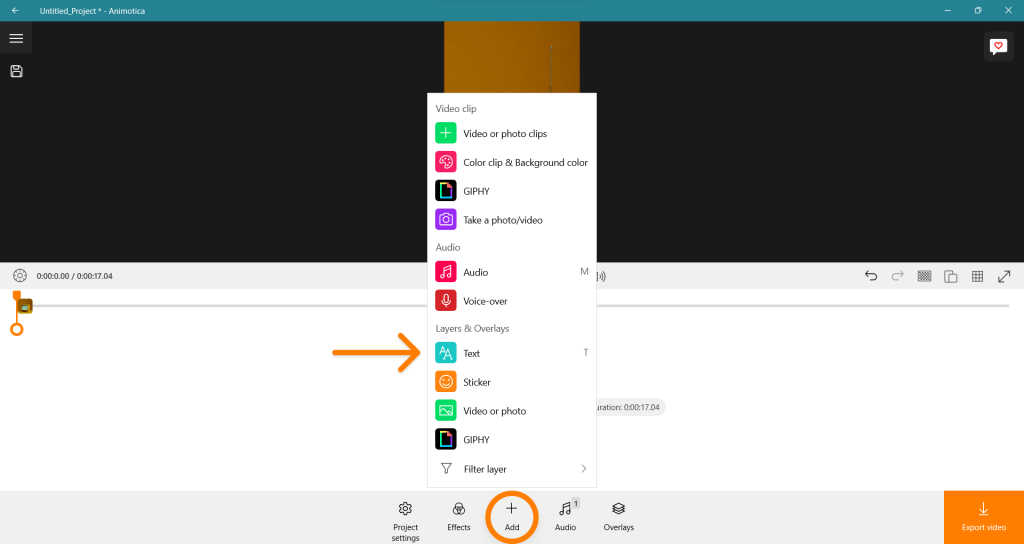
Transitioning to the topic of video captions, they can be seen as crucial elements in your YouTube Shorts. Ready to proceed? Click on the ‘Add’ button or click ‘T’ to use a shortcut, then select ‘Add text.’ After this, enter your desired caption and finalize by clicking the ‘X’.
But that’s not the end of your options. With the capabilities of Animotica, you’re enabled to manipulate the positioning and size of your caption box with ease. Looking for a larger display? Expand it. Do you want a unique orientation? Rotate it as needed. For those seeking a more aesthetic flair, consider altering the background, formatting the text, and adjusting the typography, among several other options! Unconvinced? Here’s a comprehensive guide detailing the process of adding text to your videos.
Step 5: Optional Steps
In enhancing your YouTube Shorts, consider the optional steps of including filters, transitions, and sequence arrangements. You can choose a fitting filter from the ‘Effects’ tab, select a complementary style from ‘Transitions’ for a more fluid videographic experience, or rearrange your clips in the timeline for better storytelling. Embrace creativity and experiment to create your standout YouTube Short.
Step 6: Save
As we conclude our video-editing journey, it’s time to save your YouTube Short edited in Animotica. The save button is at the bottom right corner of your screen. It will lead you to the ‘export’ window.
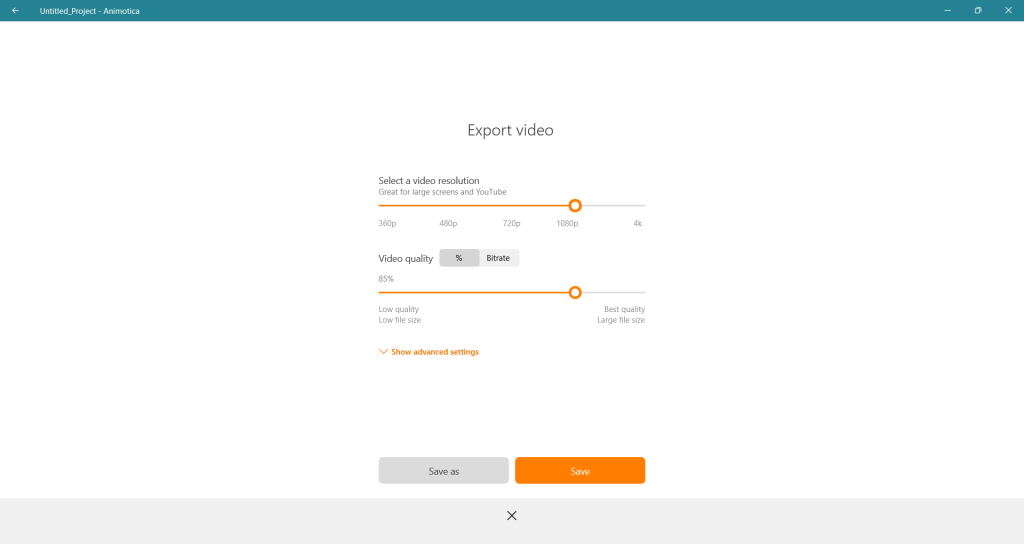
The term ‘export’ is crucial here. Ensure you save your video in 1080p or higher resolutions for optimal visual quality. Don’t hesitate to opt for higher numbers. It equates to better picture clarity.
With these steps, the process of editing YouTube Shorts using Animotica has been successfully simplified. It’s quite straightforward, isn’t it?
How to Trim YouTube Shorts on PC
Ready to level up your YouTube Shorts editing game on that trusty PC of yours? Well, it’s time to dive into the wonderful world of video trimming with Animotica. Got clips that seem a tad too drawn-out? Don’t sweat it! With Animotica, trimming is fast, simple, and efficient. Are you revved up and ready to clip those videos into shipshape? Brilliant! Let’s get to it!
Step 1: Select a video clip that you want to trim
Welcome to the director’s chair! Think of your chosen video as the star of the show and your mouse as the command center. Click on the video thumbnail to reveal a variety of editing options. Among these options, find the one labeled ‘Trim’. This is your first step towards mastering the art of editing YouTube Shorts!
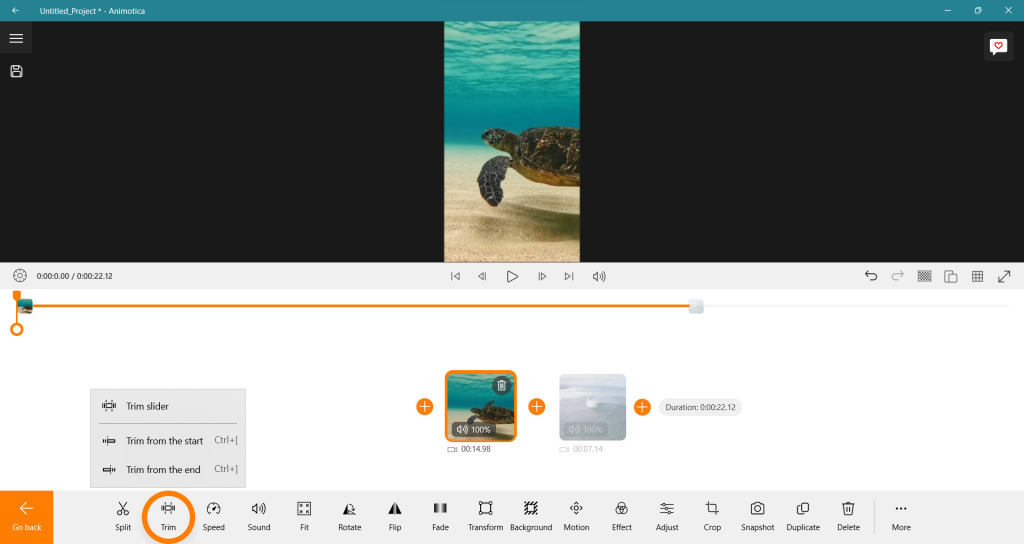
Step 2: Select Trim
Are you ready for this, folks? If you’re looking to trim your video, you’re in luck. That’s correct. You have the option to ‘Trim from Start’ or ‘Trim from End’, depending on your requirements. Perhaps you’re feeling a bit daring — in that case, don’t hesitate to use the trim slider to cut the preferred section. It’s as simple as it is enjoyable!

Step 3: Save
Great job! You’ve been diligently following the steps and have now created your very own YouTube Short. Impressive! Now, all that’s left is to save your project. Unsure of how to do it? Don’t worry! It’s as straightforward as we discussed in the previous section. A simple click, and you’re done. Get going and save your project with ease!
How to Make a YouTube Shorts Slideshow on PC
Slideshows have significantly grown in popularity within the YouTube Shorts landscape. It may surprise you to know that you can easily create more engaging and comprehensive YouTube Shorts slideshows utilizing an external video editor. Specifically, Animotica allows you to swiftly achieve this goal. Are you prepared to delve into the steps? Let’s proceed!
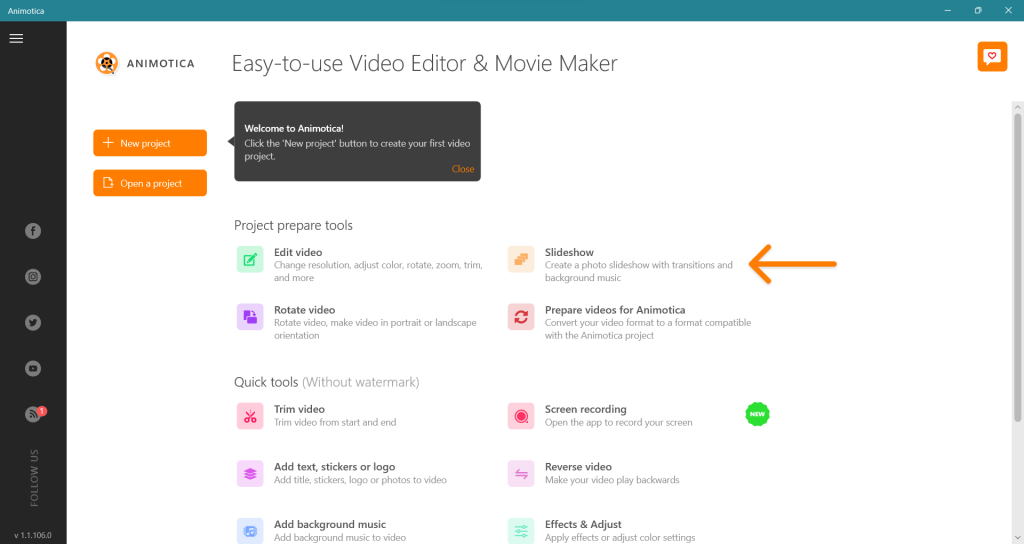
Step 1: Launch Animotica and Select Slideshow
Alrighty, you’ve got Animotica open, fantastic! Ready to create that slideshow? Let’s roll!
First off, find the ‘Slideshow’ feature on the left. Hit it, and you’re off to the races.
Step 2: Add Your Photos
Get started by gathering all the photos you’d like to include in your YouTube Short. It’s your time to shine, so be bold in your choices!
- Select the ‘Add Photo’ button.

- Go through your computer’s files and select the photos you want to use.
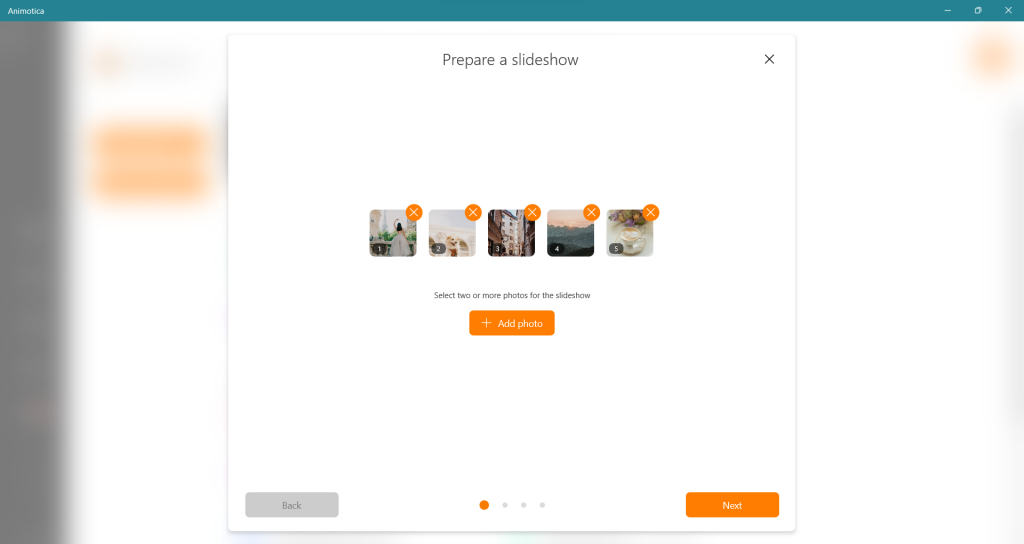
- Once you’ve chosen your photos, confirm your selection by clicking ‘Next’.
Just like that, your chosen photos are ready to be the stars of your YouTube Short. It’s a no-brainer – feel free to add as many as you wish. After you’ve arranged the photos to your liking, press ‘Next’, and you’re already onto the next phase of your editing journey!
Quick tip: You don’t have to keep the order of the photos as is. Don’t be afraid to experiment by dragging and rearranging them to create the perfect sequence.
Step 3: Hit Add Music.
Adding background music to your YouTube Short is a breeze with Animotica. Here’s how:
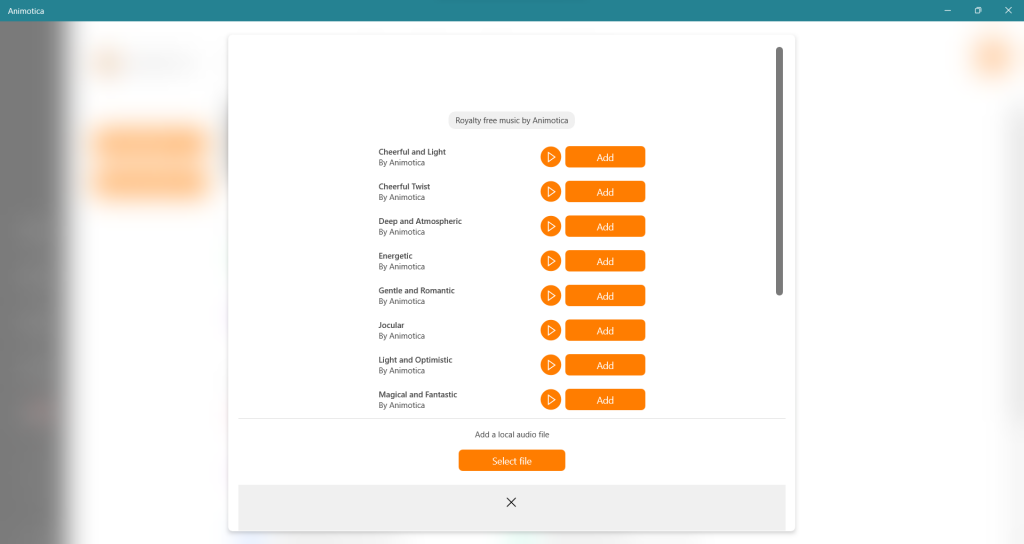
- Click ‘Add Music’. This button kickstarts the process.
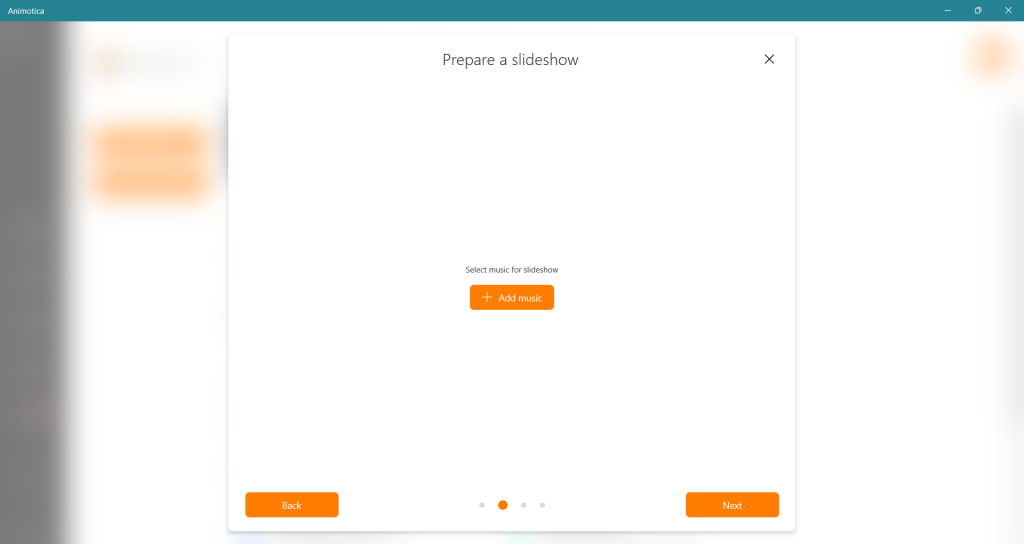
- Select a track from ‘My Music’ if you have a song in mind and understand copyright rules. Alternatively, choose from Animotica’s royalty-free music collection. From classical to pop, there’s something for every mood.
- Adjust the volume as required. Keep in mind not all viewers may enjoy a sudden loud sound. Let’s be mindful of that!
Voila! Your photo montage now pairs with a great soundtrack. Ready to further enhance your YouTube Short with some video transitions? It’s the perfect addition to your YouTube Short. Let’s continue…
Step 4: Set video transition.
With your captivating photos and riveting music added, the next step in creating your YouTube Shorts slideshow is to integrate transitions. Rather than reflecting life’s changes, these transitions serve a different purpose in the realm of video editing.
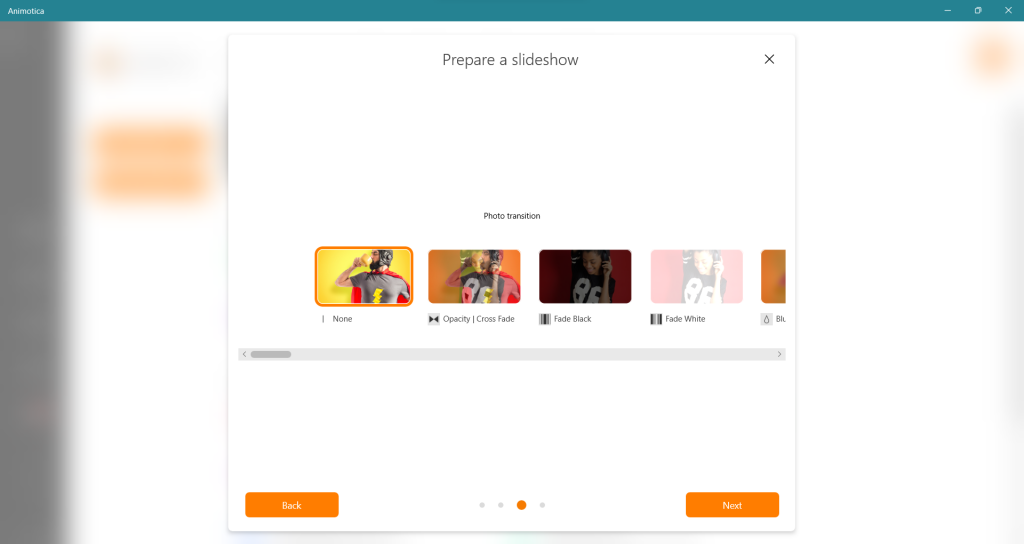
Playing the role of a subtle guide in a robust buffet, video transitions seamlessly direct your viewers from one engaging scene to the next. Applied strategically, these transitions enable your Shorts compilation to exude an aura of smooth coherence, akin to a delightful jazz ballad echoing on a tranquil Sunday afternoon.
Step 5: Choose your preferred aspect ratio
Select the 9:16 aspect ratio, which is ideally suited for YouTube Shorts, given its optimization for viewing on mobile screens. As you proceed, you’ll find some cinematic capabilities at your disposal. For instance, the duration slider allows you to control the time each slide is visible.
With these steps completed, your video is now precisely configured for YouTube Shorts. Keep in mind maintaining a consistent aspect ratio throughout the video is essential for a cohesive viewing experience.
Step 6: Save as already described
And there you have it! Wrapping things up is as simple as hitting that ‘Save’ button. Don’t worry if you’re feeling a bit muddled — we’ve gone over the saving process in the previous sections. Just remember, great editing isn’t a race. It’s all about finding fun in the journey, even when you’re just hitting ‘Save’. So, keep calm and edit on!
How to Remove Background of YouTube Shorts on PC
Did you know? You can effortlessly remove the background from your YouTube Shorts using an incredible feature known as the Chroma key or green screen technique. It is highly recommended to film your content against a solid, uniform green or blue backdrop to make this editing process smoother. This might make you feel like you’re in the midst of a major Hollywood production, but the pristine final output will compensate for it. Once everything is in place, you can say goodbye to your original background and welcome your new one with a few easy steps:
Step 1: Upload your Preferred Background
Want to jazz up your YouTube Short with a snazzy background? Maybe a beach sunset or a bustling cityscape? Just hit ‘add photos/videos’ and upload your chosen backdrop. Remember, you can use either a still image or a video as your background. Time to get creative!

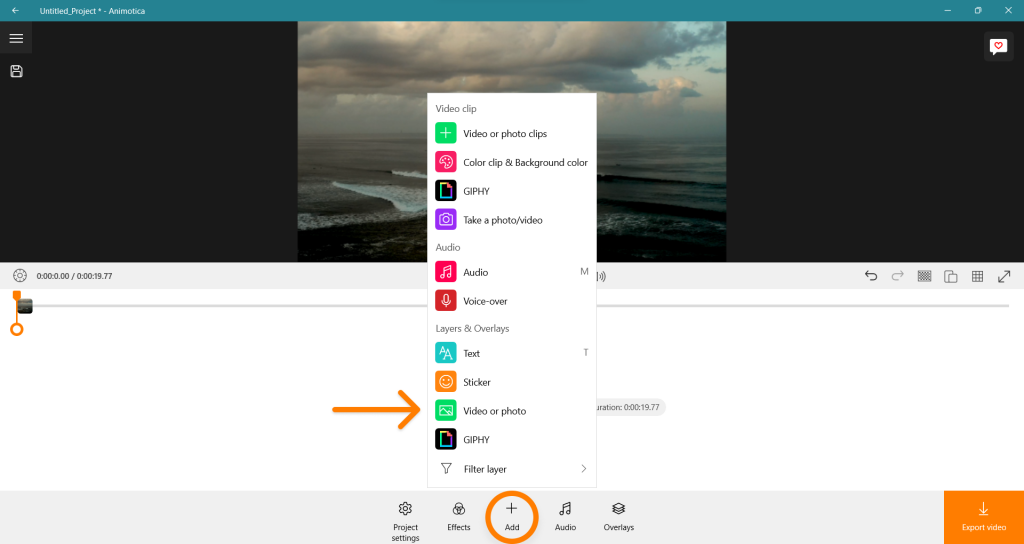
Step 2: Upload your Main Clip as an Overlay
Now let’s proceed to the next step. Spot the ‘add’ button? Click on it. Scroll down until you reach the ‘overlays’ section. Once there, you’ll find an option to add a photo or video. Select that and navigate through your PC to locate the saved video. Found it? Proceed to upload it. Excellent work! You’ve successfully added an overlay video to your YouTube Short. Your viewers are sure to appreciate it!
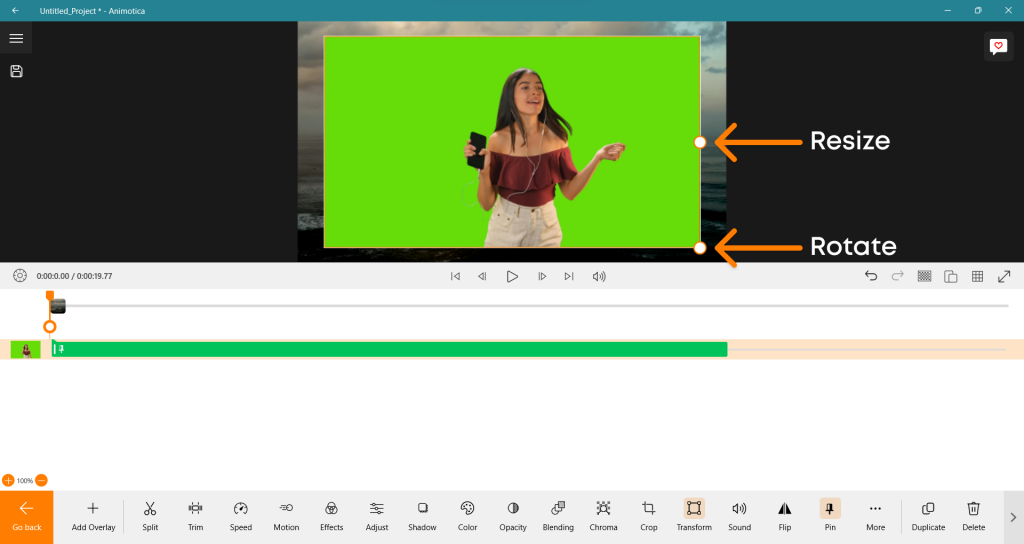
Step 3: Enlarge your Overlay and Select Chroma
Upon uploading your overlay, you may find it smaller than expected. Do not worry. You will see two rings on the uploaded overlay clip, similar to the ones in the provided screenshot. To enlarge it, grab the first ring and drag it across until your overlay entirely covers the background. It’s that simple.
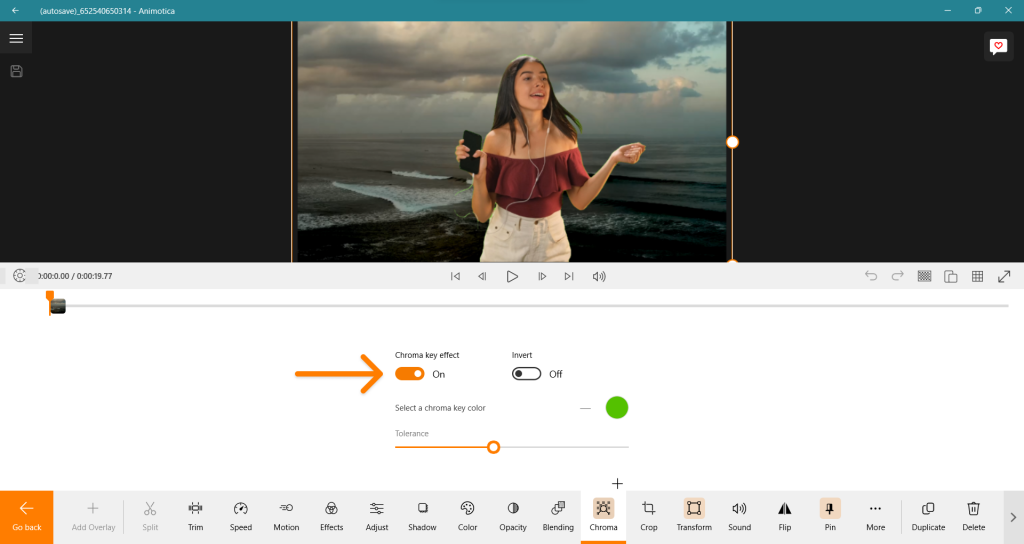
To enable Chroma Key Effect, tap on Chroma and then toggle the button next to ‘Chroma Key Effect’ to turn it on.
Conclusion
You’ve mastered the art of editing YouTube Shorts with this straightforward guide on key steps, including uploading and adjusting files on Animotica, adding mood-enhancing sound and captions, nailing video trimming, crafting slideshows, and even erasing backgrounds. No editing experience? No worries! With these easy-to-follow directions, you’re well on your way to producing engaging YouTube Shorts. Go on, spark up your content with Animotica, and captivate your audience like never before!
FAQ
What are Some Tips for Creating Engaging YouTube Shorts?
Creating attention-grabbing YouTube Shorts can seem a bit like alchemy, but with the right ingredients, you’ll have a formula that’s pure gold. Let’s delve deeper into these pivotal elements:
- Identify Your Audience: It’s essential to know who’s going to watch your shorts. Spying on your analytics can help you understand viewers’ demographics and interests. The magic happens when your content aligns with their lifestyle and preferences. For example, if your viewers are avid gamers, your shorts could provide quick gaming tips or funny gaming mishaps.
- Authenticity: Run-of-the-mill content is like that ‘re-giftable’ fruitcake – nobody wants it. Time to infuse your personal touch. Sharing your travel mishaps or cooking disasters can present unique, relatable content.
- Brevity: YouTube shorts are like speed dating for viewers. You’ve got 15 to 60 seconds to make an impression. Cut useless blahs, and focus on punchy lines and visuals that deliver your story in an engaging yet concise manner.
- Quality Audio: Sound quality can make or break your video immersion. Invest in a decent microphone, and consider using bed tracks or Foley sounds to heighten your storytelling. And remember, no one likes crackling and popping except when it’s popcorn!
- Attention-Grabbing Thumbnails: Thumbnails are the cheesy pickup lines of the YouTube world. Use high-contrast colors, short, exciting texts, and emotionally expressive faces to stir curiosity.
- Include Captions: Imagine trying to understand a foreign film sans subtitles. Captions help viewers who are hard of hearing or prefer silent watching. They’re also a chance to infuse humor – ‘misheard lyrics,’ anyone?
- Conclusive Ending: Imagine being left hanging after a thrilling movie cliffhanger. Frustrating, right? Apply the same principle to your video. Wrap up your content nicely, and nudge viewers to like, share, or follow – which they are more likely to do if they enjoyed your content.
Remember, while there might not be a one-size-fits-all solution in creating YouTube Shorts, knowing what tickles your viewers’ fancy, being uniquely you, and enjoying the creative process usually leads to success. Ready to make some gold-star content? We know you can!
Can I Edit YouTube Shorts on a Mobile Device?
Is it possible to edit YouTube Shorts on a mobile device? Absolutely. The app is specifically designed to facilitate this process. Users can indeed edit YouTube Shorts using either the YouTube app itself or various other third-party video editing apps. Let’s delve into this:
- Method A – YouTube App: Users can perform basic edits directly within the YouTube app, such as trimming footage, adjusting video speed, applying filters, and adding music. However, for more comprehensive editing capabilities, consider Method B.
- Method B – Third-Party Apps: Numerous video editing apps are accessible on the Play Store and App Store. Applications such as Adobe Premiere Rush and Kinemaster offer advanced editing tools, ranging from transitions and effects to overlays, and support vertical video editing.
It’s crucial to remember that while editing on a mobile device offers undeniable convenience, it may not offer the extensive range of features or the level of precision that PC editing does. This doesn’t mean it’s impossible to produce high-quality content on a mobile device – it simply means that PC editing might offer a more detailed approach should you require it.
Is it Possible to Post YouTube Shorts from PC?
Uploading your YouTube Shorts from a PC is no sweat. First, choose a short video, up to 60 seconds, in a square or vertical aspect ratio. After logging into YouTube, click ‘Create’, then ‘Upload videos’, and proceed to upload your video.
Hot Tip: Be sure to use the ‘Details’ tab to input essential metadata – title, description, and tags. Throw in #shorts in the description or title for an extra visibility boost.
Next, at the ‘Visibility’ tab, choose to post now, schedule, or save as a draft. Finally, click ‘Done’ to upload your YouTube Short. Remember, for your Short to stand out, it has to be creative, unique, and engaging. Happy uploading!