Are you aspiring to make your mark on YouTube with reaction videos but feeling lost on where to begin? Fear not, dear reader! Consider this guide your trusted co-pilot on this creative escapade. We’re going to lay down the vital steps to creating an enthralling reaction video. We’re talking about a video that’s not only a “love at first sight” for your audience but also a constant allure — making them return time and time, excited to hit play.
Contents
What is a Reaction Video?
Imagine filming yourself as you experience a video for the first time — that’s the heart of a reaction video. The star of the show is a “reaction YouTuber” who colorfully reviews an eclectic mix of videos, which could swing from the latest Hollywood trailer to some viral sensation sweeping the internet.
This concept isn’t fresh off the boat; it’s been around the block a few times. But the spotlight has truly hit it with the surge of YouTube and other social media platforms, turning it into a magnet for views in the millions. So, for creators scouting for popular content, reaction videos have quite the fanbase.
Why are Reaction Videos Popular?
Did you ever find yourself laughing hard as you watched another’s reaction to the newest viral video or effusive commentary about a fresh music release on YouTube? That is the charm of reaction videos. Furthermore, these videos are experiencing a surge in popularity. The reason? Quite basic – individuals are drawn towards shared experiences. Reaction videos provide an unfiltered, relatable platform for viewers to indirectly partake in the excitement of a first-time watch or listen – no surprise that these videos are as hot as a smartphone post an extended video call.
Intuitive and sincere reactions are the key drivers behind YouTube channels like REACT gaining enormous subscriptions and views. With formats ranging from teenagers reacting to retro music to the older generation reacting to advanced technology, the REACT channel flawlessly exemplifies the concept of reaction videos. The channel’s diverse array of reactors and topics is like a glimpse into various cultures, viewpoints, and personas.

Moreover, these videos provide an intriguing look into different individuals’ worlds, ideas, and spontaneous reactions – sounds intense. Nonetheless, it’s rather exciting. Plus, it should be noted – they serve as excellent sources of amusement. Had a taxing day? Dial into some reaction videos. Struggling with boredom due to a cold? Reaction videos from channels like REACT can serve as engaging diversions. Now, if your internet has tripped, there isn’t much to be said about that.
Set Up Your Recording Environment
Remember, the goal is to eliminate background noise and distractions, allowing your reactions to take center stage. After all, it’s a reaction video, not an ‘all the random sounds in your house’ video, right?
Choose a Quiet Location
Selecting a quiet location to record your reaction video is crucial. Distractions such as background noise should be minimized for the best results. Here’s how you can achieve that:
Quiet Recording Spot Suggestions:
- Use Soundproofing Materials: Consider using soundproofing foam panels on walls and ceilings to eliminate echo.
- Choose Suitable Timing: To avoid noise, consider filming during quieter periods, such as early morning or late at night.
- Use Furnishings Creatively: Furniture and soft furnishings can block out sound efficiently – heavy curtains or bookshelves could be particularly useful.
Use Good Lighting
A well-lit reaction is hard to beat. Make sure your recording environment is barely adequate and brimming with light, ensuring those unwanted face shadows aren’t stealing the spotlight.
Have shadow troubles? Don’t let it take over your scene! A ring light or a couple of studio lamps could be your knights in shining armor. And, the good news – they don’t always demand a king’s ransom. Want more wisdom tips on perfect lighting? Our handy guide here can be of great help.
Use a High-Quality Webcam
A high-quality web camera is essential to ensure your viewers can see your reactions. Don’t underestimate the power of a good video resolution – crisp, clear visuals distinguish between appearing as a pixelated mess or a smooth streaming superstar.
Furthermore, framing is crucial – ensure you’re centered in the shot with enough of your surroundings visible to provide context but not so much that it distracts from the main subject – you! If you are using a smartphone, make sure that the camera is positioned at eye level and that you are not holding it too close to your face.
Choose the Right Camera Angles
Have you ever heard the phrase, “Keep good company, but keep your camera closer?” Even if you have never encountered this expression, the inherent concept is critical: your camera is an essential companion for expertly done reaction videos. You might say that achieving the correct camera angle while recording your reactions is almost as critical as the reactions themselves – a close rival.
Use a Good Microphone
Quality sound is as essential as clear video. So get on board with a good, no, scratch that, a fantastic microphone to ensure your audience is hearing your shrieks, gasps, and giggles loud and clear.
When choosing the right microphone, remember some important things – the pickup pattern and the type. For instance, a unidirectional mic (which picks up sound from one direction) might be the best choice for a reaction video; you don’t want it to pick up the sound of your PC fan, right? Also, consider condenser microphones. They’re excellent for capturing vocal sounds.
Avoid Copyright Issues
Diving into copyright issues for your reaction channel? Brace yourself. It’s critical yet tricky! A single copyright infringement claim can disrupt your dream YouTube journey. So let’s dodge that bullet together, shall we?
Artists and corporations zealously protect their creations. Using their video without permission or fair use? Uh-oh,! Copyright Strike is going your way – disastrous!
Imagine sipping your morning coffee and finding your YouTube account suspended. Unsettling, right?
To keep your channel unscathed, opt for “Creative Commons” licensed videos or directly ask the creator. Using “fair use” guidelines for video commentary or critique can also work, but remember, there’s no magic in it!
Respect artists and stay updated with copyright laws to avoid a sudden shutdown of your channel. Remember, it’s about playing fair and smart!
How to Make a YouTube Reaction Video on PC
Now that you understand the basics of recording a reaction, let’s explore the technical details of capturing and refining your video for a professional look.
Step 1: Record Your Reaction
Your initial task is to secure a copy of ScreenMix from the Microsoft Store. While the base version of the software comes without a price tag, it’s worth considering the Pro upgrade for advanced capabilities – mainly if producing top-tier content is part of your plan.

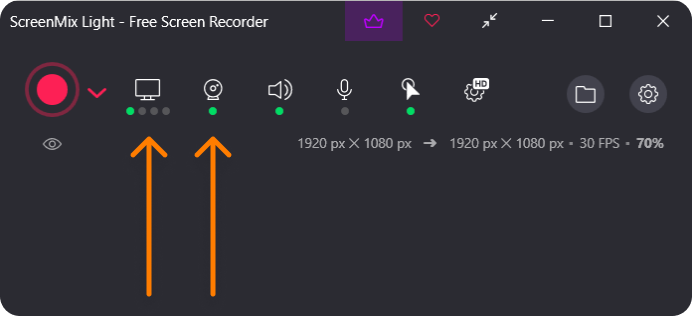
With the software ready, it’s time to choose a target window for capturing. After doing so, activate the camera overlay. This nifty feature serves a key objective – it lets you capture spontaneous reactions, avoiding expectation-dulled responses from repeat viewings. Remember, authenticity is pivotal in this field.
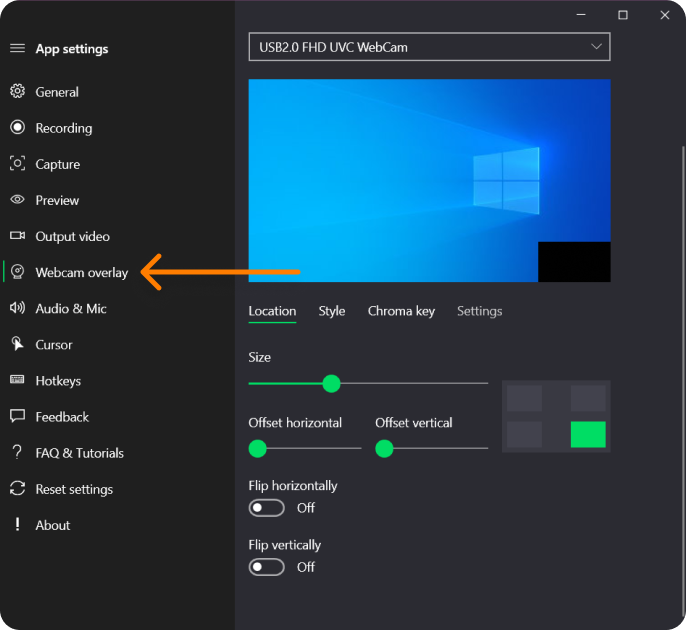
Also, you can alter the overlay’s aspect, from changing its position and tweaking its dimensions and style to triggering the Chroma Key effect found in the Pro version. True, it’s not an absolute must-have. But it does usher in a stroke of creativity – wouldn’t you concur?
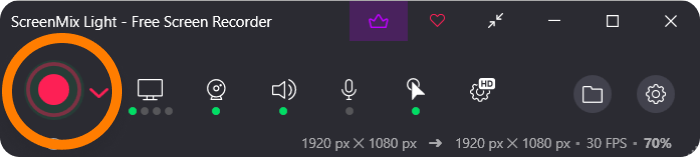
Lastly, go ahead and hit ‘record.’ You’re now poised to produce compelling reaction videos.
Step 2: Edit Your Footage
Once you’re done recording in ScreenMix, it’s time to stride over to Animotica and set up shop. Haven’t installed Animotica yet? Well, this is your golden opportunity, my friend!

A juicy little nugget of info for you: ScreenMix and Animotica are like two peas in an editing pod. Their seamless integration allows you to transfer your video content between them with just a single click— easier than slapping together a peanut butter sandwich, right?
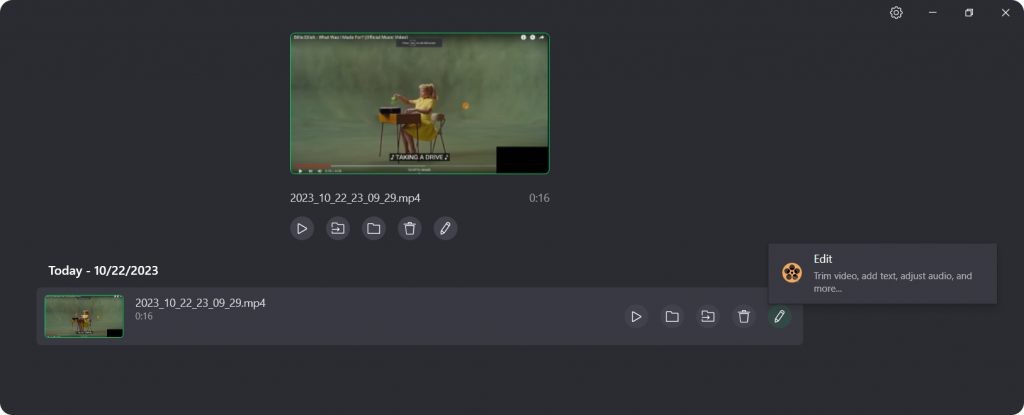
Stepping into the realm of Animotica, the software’s versatility will leave you amazed. Packed with options to crop, trim, cut, apply 3D LUT filters, transitions, overlay text, photos, videos, music, emojis, GIFs, add voice-overs, and more — it’s time you held the reins and crafted reaction videos that scream ‘you.’ So, what’s the hold-up? Get in there and make your mark!
Step 3: Preview and save your video
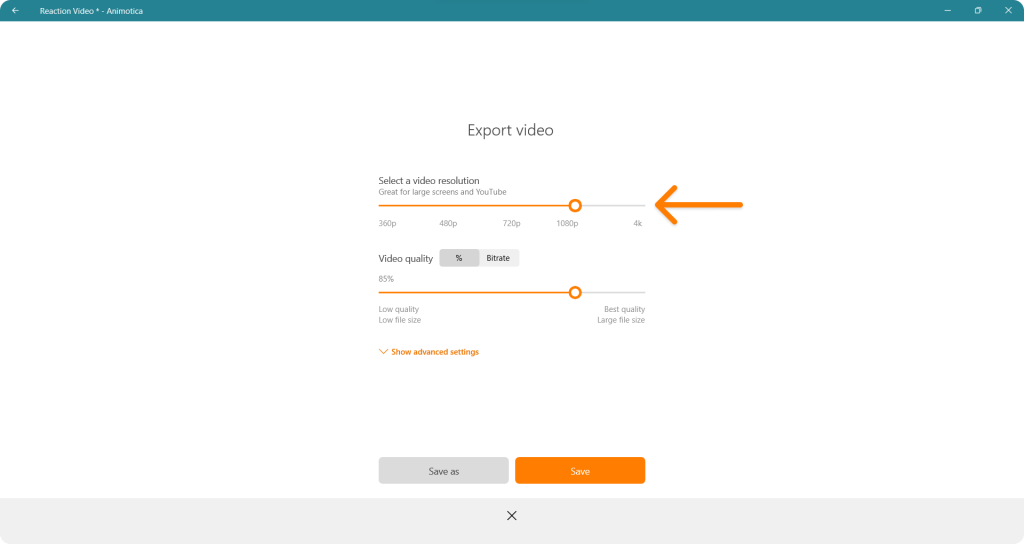
Before you proudly upload your reaction video masterpiece, don’t forget the cardinal rule– consistently hit the Play button for a preview! Only then, if you’re satisfied, go ahead and tap the Export button, selecting the video resolution of your choice in the process.
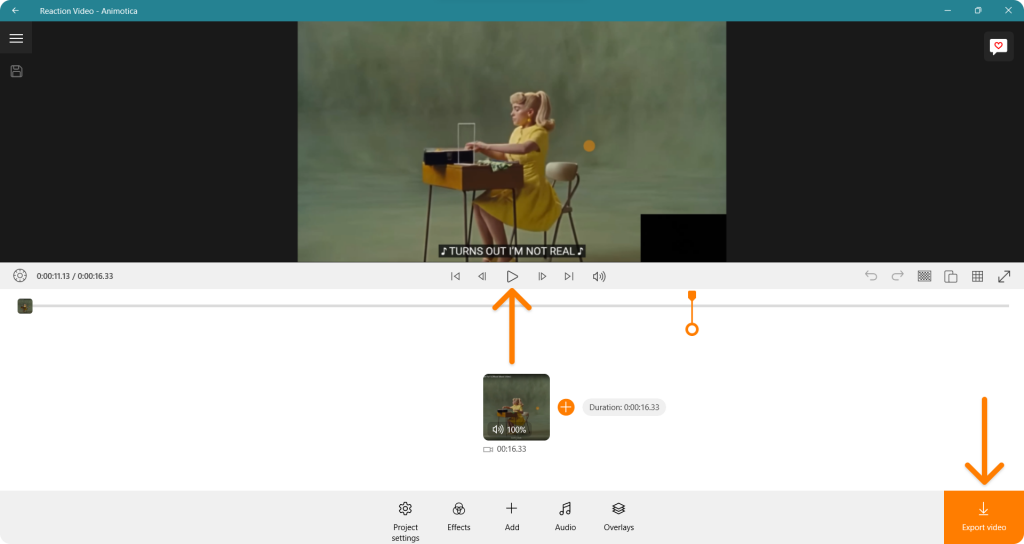
And hey, here’s a quick tip– stick with a 1080p video resolution for stellar quality. However, if you’ve filmed some 4K content and you’re one of Animotica’s Full Pro users, you can go ahead and save in 4K video resolution. Now, that’s what we call top-tier quality!
Tips for Recording Your Reaction
Remember, maintaining a balance of professionalism and charm throughout your recording is not just a bonus. It’s the whole enchilada!
Stay Authentic and Genuine in Your Reaction Videos
Looking to establish your niche in the YouTube reaction video realm? You need one vital tool – authenticity. It’s not about flawless acting. It’s about being your true self. Your reactions create video magic. Your audience seeks reality, whether joy, shock, confusion, or disappointment.
Viewers can spot a sham from a mile away. Keep this in mind – the camera is your truth meter. The question is, how to keep it authentic? The answer is simple:
Stay true to your reactions. Don’t play up emotions for clicks. Honest reactions draw the crowds in. And if you occasionally miss the mark, no sweat! We’re all human, right? Above all, remember – authenticity is pure gold on the web – own it, guard it, and show it off!
Engage with Your Reaction Video
We’ve all seen those reaction videos where the person just sits there, not exactly blockbuster material, right? The key to a stellar reaction video? Engagement. It’s about engaging with the content and letting your audience tag along.
Make it happen by bringing in your unique perspective. Whether you’re commenting on a music video’s melody or a movie’s camera work, spice up your commentary with personal stories and in-depth analysis. But keep it real – allow your emotional reactions to come alive. It’s your authenticity that will captivate your viewers.
“Your viewers are here for your reactions, so engage with the video as if it can hear you – because in a way, it sure can!”
So, press ‘Play’ and let the camera roll with your engaging reactions!
Examples of Successful Reaction Channels
Dreaming of a YouTube career with reaction videos? Buckle up for some insights from top players!
TheFineBros (REACT)
First, we have TheFineBros, a.k.a REACT, the OGs of reaction videos. Their secret? Authenticity and engaging discussions. Take note.
Tyrone Magnus
Then Tyrone Magnus shows the perks of being a genre-spanning reactor. Remember: flexibility can be a winning move.
BlastphamousHD
Rounding things up, we’ve got BlastphamousHD making everything funny. The lesson: engaging, relatable content is king.
So, what’s the recipe for success? Authenticity, humor, flexibility. Mix well, and let the YouTube stardom begin!
Conclusion
So, we’ve shared the secrets of creating captivating YouTube reaction videos. Remember the essential elements of a great recording environment: good lighting, a clean backdrop, and a reliable camera. What’s the golden rule here? Be yourself! Your viewers are like human lie detectors, so keep your reactions original and genuine.
We’ve delved into the how-tos of recording and editing to achieve that video “wow” factor. Apps like Animotica and ScreenMix are celebrated tools in the field because these pals can convert raw footage into a snazzy masterpiece. But wait, don’t forget about the audio! Balance your sound levels to ensure your responses aren’t overshadowed by the video you’re reacting to – because, let’s be real, you’re the show’s star.
Remember, observing is just as important as creating. Studying popular reaction channels lets you catch valuable tricks that send your content to soaring levels. So, keep an eye out for those trailblazers!